
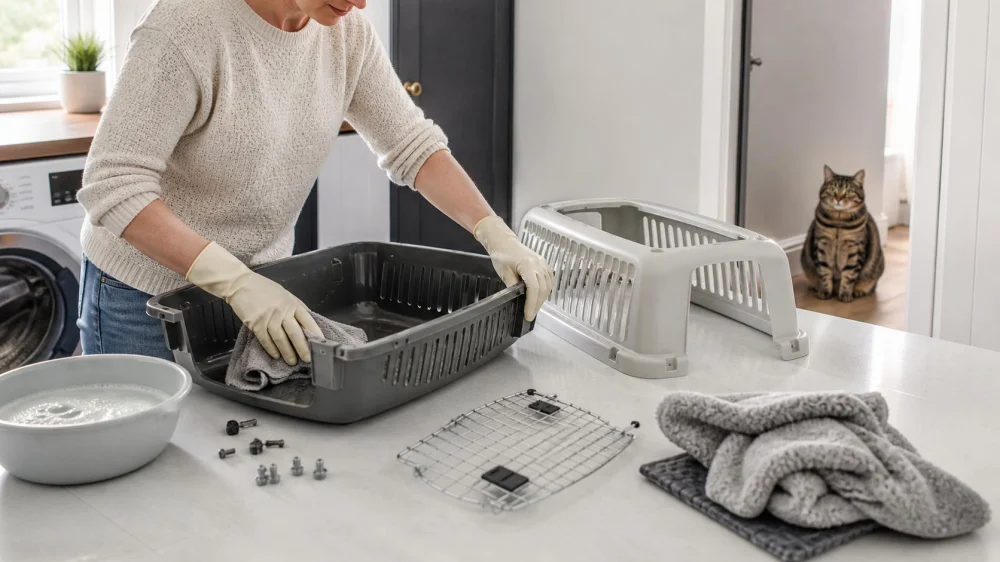
Clean a Pet Carrier Safely Before the Next UK Vet Trip
On this page
Quick answer
Empty the pet carrier, remove bedding, and inspect every fastener before cleaning. Use the carrier maker's method for plastic, fabric, metal, and foam parts; remove soil before any disinfectant; never mix chemicals; rinse when directed; and let every part dry fully before reassembly. Replace cracked shells, torn mesh, sharp edges, or unreliable doors. Ask your UK vet for an infection-specific cleaning plan after contagious illness.
This guide is for routine dog and cat carrier care in the United Kingdom. Product materials and veterinary infection-control needs differ. Manufacturer and veterinary instructions take priority.
Monty & Mabel’s
Unit 4A, Denton Holme Trading Estate, Chapel Pl, Carlisle CA2 5DF, UK
Empty and inspect first
- Work in a ventilated area away from the pet, children, food, and food-preparation surfaces.
- Wear gloves when urine, faeces, vomit, blood, or unknown contamination is present.
- Remove bedding, bowls, toys, absorbent pads, straps, and detachable panels.
- Photograph how doors, bolts, and straps fit before disassembly.
- Check shell, seams, mesh, zips, handles, latches, screws, and ventilation openings.
Do not continue using a carrier with a loose door, cracked handle, exposed wire, chewing damage, broken zip, or gap the pet can enlarge. Cleaning cannot restore structural safety.
Grove Vets, Randalstown
RandalstownAntrim and NewtownabbeyNorthern Ireland
2-6 Main St, Randalstown, Antrim BT41 3AB, UK
Clean by material and contamination
Remove hair and dry debris first with a dedicated brush or vacuum attachment. Wash hard surfaces with a compatible detergent and warm water, working into corners and around latches. Avoid soaking non-waterproof hinges, electronics, cardboard inserts, or foam.
Wash removable fabric and bedding according to care labels. Use a laundry bag when hardware could damage the machine. Dry fully before returning it. A soft-sided carrier may need hand cleaning and air drying to protect coatings and shape.
Clean tools after use and keep them separate from kitchen brushes. Dispose of waste according to local and veterinary guidance.
Disinfect only with a compatible plan
Cleaning removes soil; disinfection uses a product and process intended to reduce specified microorganisms. Disinfectants work only when dilution, pre-cleaning, wet contact time, temperature, and rinsing match the label.
- Use a product suitable for the carrier material and animal environment.
- Never mix bleach, ammonia, acids, or other cleaners.
- Keep the pet away during application and drying.
- Ventilate the area and use protective equipment listed on the label.
- Rinse food-contact or animal-contact surfaces when directed.
After ringworm, parvovirus, respiratory infection, parasites, or another contagious condition, ask the veterinary practice what product, concentration, contact time, laundry method, and disposal steps apply. A routine household spray may be ineffective or unsafe.
Dry and reassemble completely
Water trapped under a mat, inside foam, or around hardware can create odour, corrosion, or microbial growth. Air-dry parts separately in a secure clean area. Do not use high heat unless the product allows it.
Reassemble using the photograph and manual. Confirm every screw, clip, zip, and latch is present. Open and close the door repeatedly, lift the empty carrier by its handle, and apply gentle pressure to seams. Add only clean dry bedding that does not block ventilation.
Store for easy future use
Keep the clean carrier assembled and accessible when practical so it can become a familiar resting place rather than appearing only before stressful travel. Leave the door secured open when used for training and ensure it cannot swing or trap the pet.
Store away from damp, direct sun, extreme temperature, pests, garage chemicals, and falling objects. Keep a clean absorbent pad and spare bedding nearby, but do not seal damp textiles inside.
Damage and infection-control limits
Replace or obtain manufacturer advice for cracks, stress whitening, rust, torn mesh, damaged coating, sharp edges, missing hardware, unreliable locks, or a handle that flexes abnormally. Do not patch a structural failure with tape or cable ties for transport.
Call the vet before cleaning when contamination may involve a zoonotic or highly contagious disease, toxic chemical, medication, or bodily fluid from an animal with unknown status. Seek medical advice for significant human exposure according to the product or veterinary guidance.
Frequently asked questions
Can I use bleach in a pet carrier?
Only when the veterinary and product instructions specify a safe dilution, material compatibility, contact time, ventilation, and rinse. Never mix it with other cleaners.
How often should I clean the carrier?
Clean after soiling and after trips as needed, and inspect before every use. Infection, parasites, or shared-carrier use may require a specific schedule.
Can a fabric carrier go in the washing machine?
Only if its care label allows it and removable stiff parts and hardware are handled correctly. Machine washing can damage coatings, foam, or structure.
How do I remove a urine smell?
Clean the source with a compatible product rather than masking it with fragrance. Repeated odour may mean liquid entered foam or seams that cannot be cleaned fully.
Can I lend the carrier to another pet?
Inspect and clean it appropriately between animals. Do not share during contagious illness, and confirm size, ventilation, and restraint compatibility for the other pet.
Sources and evidence notes
This article reflects general veterinary and equipment-care practice: clean before disinfecting, respect contact time and compatibility, dry completely, separate contaminated tools, and replace structurally damaged carriers. Disease-specific protocols require veterinary direction.
Next steps
Open the carrier today, remove old bedding, and inspect every latch, seam, and handle. Save the current cleaning manual, then wash and dry each compatible part. Reassemble and test the empty carrier. Store it clean and accessible with fresh bedding so the next vet trip does not begin with damaged equipment or hurried cleaning.



 The Cattery @ Cherry Tree Farm5.0 (26 reviews)
 Lahbah petshop0.0 (0 reviews)
 Aquatic Finatic4.0 (417 reviews)
 Gilmoor Vets, Durham4.0 (480 reviews)
 Vets4Pets - Rotherham Parkgate4.0 (403 reviews)
 Fraser Veterinary Physiotherapy5.0 (2 reviews)
 Complete Guide to Vaccination Guide for Rabbits in the UK
 Recognising Allergy Symptoms in UK Dogs and Cats: What to Watch For
 Complete Guide to Nutrition Tips for Hamsters: What Your Pet Needs to Stay Healthy
 Top 10 Allergy Care Every Hamster Owner in the UK Should Know
 Seasonal Health Tips for Keeping Your Kittens Healthy in the UK
 Pet Coughing: What UK Owners Should Record for the Vet