
How to Record a Pet Symptom Video for Your Vet
On this page
- Quick answer
- What a video can and cannot show
- Put safety before filming
- Set up a useful recording
- Record walking and movement
- Record breathing without disturbing your pet
- Record intermittent episodes
- Add the clinical context
- Send and store the file safely
- Limits and emergency boundaries
- Sources and evidence notes
- Frequently asked questions
- Conclusion and next steps
Quick answer
A useful pet symptom video is short, steady, well lit, and recorded without forcing or delaying care. Start with the whole animal, then show the relevant movement or body area from a safe angle. Keep the original file and tell the vet when it happened, how long it lasted, what came before and after, and which medicines were given. A video supports—but does not replace—a veterinary examination.

What a video can and cannot show
Some symptoms disappear at the clinic or occur only at home. A video can preserve the rhythm of a cough, an unusual walk, breathing effort, a tremor, an episode, or a behaviour change. It also lets a vet see the environment and the sequence over time.
However, a recording cannot reliably show temperature, pain severity, heart or lung sounds, hydration, internal injury, or every neurologic finding. Camera angle, sound, lighting, stress, and playback speed can mislead. A normal-looking clip does not rule out disease, and an alarming-looking movement cannot be diagnosed from video alone.
Ask the practice whether it wants a video before the appointment and how to send it. Remote information may help triage or preparation, but the vet may still need a physical examination and tests.
West Mount Vets - Huddersfield
Unit 2, Castlegate Retail Park St Johns Rd, Huddersfield HD1 5AN, UK
Put safety before filming
Call the veterinary practice or its emergency provider first if your pet has difficulty breathing, collapses, cannot stand, has a seizure, has severe bleeding, has major trauma, may have swallowed poison, or appears critically unwell. Follow the vet’s instructions. Do not spend time staging a recording.
Never provoke a cough, limp, collapse, breathing problem, aggression, pain response, or seizure. Do not force a painful or frightened pet into position. PDSA advises owners not to force an animal to be photographed, especially when the pet is in pain, frightened, or panicked.
Use distance or zoom rather than putting your face or hand near an animal that may bite. Keep stairs, traffic, water, heat, other animals, and breakable objects out of the recording area.
Set up a useful recording
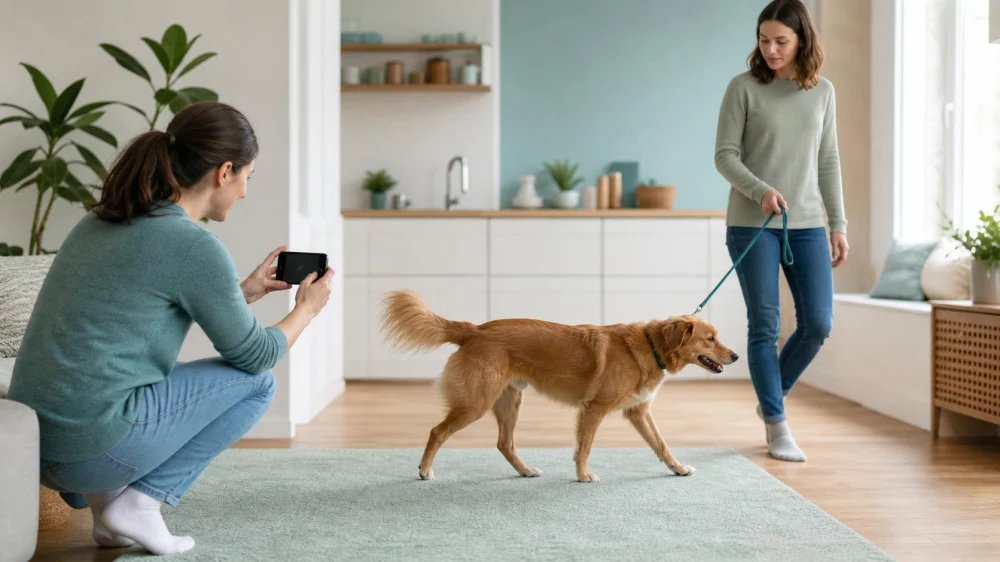
Clean the camera lens and use bright, even light. Record in normal speed with sound on. Hold the phone horizontally unless the practice asks for another format, brace your elbows, and avoid digital filters, portrait blur, music, captions, or edits that obscure timing.
Begin with two or three seconds showing the whole animal and surroundings. Then move closer only if safe. Include a familiar object or floor pattern for scale when relevant, but never press a ruler against a painful area.
Keep most clips between 10 and 30 seconds unless the vet requests longer. One clear clip is easier to review than many duplicates. If the symptom changes, record a second angle or later episode and preserve each timestamp.
Record walking and movement
Use a flat, nonslip, well-lit surface. Ask another person to walk the pet naturally on a loose lead if that is safe and comfortable. Do not make the animal run, jump, climb, or repeat a painful action to exaggerate a problem.
Capture several normal steps from:
- The side, showing the full body and all limbs.
- The front as the animal approaches.
- The rear as the animal walks away.
- A wider angle showing how the pet rises or turns, if this happens voluntarily.
Tell the vet which surface was used, whether the pet had just rested or exercised, and whether the clip shows the typical problem. Avoid slippery floors, tight circles, repeated stairs, and food lures if they make movement unsafe.
Record breathing without disturbing your pet
Film from the side while the pet is resting naturally, without touching, exciting, or repositioning it. Frame the chest, abdomen, and head so the vet can see the rate, rhythm, effort, posture, and whether the mouth is open. Include sound when coughing, wheezing, snoring, or another noise is the concern.
PDSA’s UK owner guidance suggests a short side-on breathing video and notes that the chest, abdomen, and mouth should be visible. If the animal appears to be struggling for breath, do not wait for a perfect clip—contact a vet urgently and minimise stress.
Do not count breathing immediately after play, travel, heat exposure, or excitement unless that is the episode you are reporting. State whether the pet was asleep, resting awake, panting, or active.
Record intermittent episodes
For shaking, collapse, unusual eye or head movements, coughing spells, or other brief events, start a timer and record from a safe distance if doing so does not delay help. Capture the whole animal, then the recovery period if the vet advises and it is safe.
During a seizure, protect the area from hazards, reduce stimulation, and time the event. Do not restrain the animal or place hands near its mouth. PDSA notes that a video can provide useful clues, but contacting a vet and first aid take priority.
Do not label the episode yourself as a seizure, faint, pain, or behavioural problem. Describe observable facts: “fell to the left, legs became stiff, did not respond to name, then paced for five minutes.”
Add the clinical context
A clip without context can be difficult to interpret. In the message or a separate note, include:
- Pet’s name, species, breed, age, sex, and current weight if known.
- Date, time, duration, and whether the clip shows the start, middle, or end.
- Activity, food, exercise, sleep, stress, or possible exposure immediately before it.
- How often it has happened and whether frequency or severity changed.
- Responsiveness, appetite, drinking, toileting, mobility, and recovery afterward.
- Current medicines and the last amount and time actually given.
- What is typical for this pet and what looks different.
Keep observations factual. “Breathing looked harder than usual while asleep” is more useful than “heart failure.” Mention if the video does not fully represent the worst episode.
Send and store the file safely
Use the practice’s approved email, portal, or messaging method and follow its size limit. PDSA’s client guidance recommends a small number of clear files with the animal’s name and a brief issue description. Your own practice may use different instructions.
Do not post the clip publicly for diagnosis. Public replies may be inaccurate, expose personal information, or delay care. Remove unrelated people, addresses, documents, and conversations from the frame where possible.
Keep the original file with its timestamp until the case is resolved. If you trim a copy for sending, retain the unedited version. Note when and where you sent it and call the practice if an urgent clip has not been acknowledged.
Limits and emergency boundaries
This guide is general UK pet-owner information and cannot determine urgency for an individual animal. Contact a veterinary practice whenever you are concerned, and use its out-of-hours provider when the regular practice is closed.
A remote review does not guarantee a diagnosis or prescription. RCVS guidance recognises remote consultation within professional care but requires appropriate clinical assessment and access to physical examination and follow-up where needed.
Do not delay transport, first aid, poison advice, or emergency treatment to film, upload, or wait for a response. If instructed to travel, secure the animal safely and continue timing or observing only when another person can do so without distracting the driver.
Sources and evidence notes
This article reflects PDSA guidance on veterinary photographs and videos, including short side-on breathing clips, natural movement, avoiding force, and timing and filming seizures when safe. It also reflects RCVS principles that remote information can support care but does not remove the need for an appropriate clinical assessment or physical examination.
Exact emergency thresholds depend on the species, symptoms, history, and veterinary judgement. That is why the article prioritises contacting a vet over self-triage from a recording.
Frequently asked questions
Should I use slow motion?
Send normal-speed footage first. Keep the original and ask whether the vet also wants a slow-motion copy.
How long should the clip be?
Often 10 to 30 seconds is enough for movement or breathing, but an episode should be timed accurately. Follow the practice’s request.
Should I wake my pet to film breathing?
No. Record the natural resting state without disturbing the animal, unless the vet gives different instructions.
What if the symptom stops before I record it?
Write down what you saw, timing, triggers, and recovery. Do not recreate it. Contact the vet based on the concern.
Can a vet diagnose from my video?
Sometimes a clip helps narrow questions, but many problems still require examination or tests.
Conclusion and next steps
Save the practice’s contact and file-submission method before you need it. When a symptom occurs, prioritise safety, record a short natural clip only if appropriate, and attach a factual timeline and medication list. Send the original-quality file through the approved channel and remain available for questions. If the pet may be in distress, call first and film only when it does not delay care.

 Browtop Cattery5.0 (1 reviews)
 Shield Aquatics4.0 (28 reviews)
 The Ings Luxury Cat Hotel5.0 (79 reviews)
 Natural treats for wiggle butts5.0 (2 reviews)
 Herdman Country Club for Cats4.0 (9 reviews)
 Oakhill Export Vets5.0 (2 reviews)
 Can Guinea Pigs Eat Corn Husks? Safe Fibrous Treat Guide for Small Pets
 Vet-Approved Dental Care for Senior Pets
 Vet-Approved Exercise and Fitness for Reptiles
 Expert Vet Advice on Travel Safety for Exotic Pets
 How to Improve Reptiles Parasite Prevention at Home
 How to Tell If Your Dog Has a Nasal Tumor: Signs to Watch